Tuesday, June 23, 2015

My 1st Year as a 1-to-1 Teacher


June 22, 2015:

First, a disclaimer. I am certain that there are other teachers out there who have used their laptops more effectively than I have this year. You should find those teachers, talk to them, and pay attention to what they have to say.

Also, I'm intentionally not going to talk about the fancier stuff like Nearpod and Socrative and Blendspace that Chris covers in his trainings. Those are all excellent and you should definitely check them out. My focus is going to be on more of the nitty gritty tools that I've found myself using this year.

What I have to offer is a reflection on what tools I used this year and practical thoughts on how to use them. I don't know about other teachers, but it took me a little while to figure out the ramifications and effects of using laptops in the classroom on a regular basis. I still haven't figured it out, but I will share what I can, with the caveat that there is almost certainly a better way to do it that I haven't figured out yet and if you have, I'd appreciate you sharing.

The web tools and how I used them in year one of 1-to-1:

The primary tools I used this year were:


Because things are getting a little tl:dr here, I'll start with Google Classroom and make later posts for the others.

Google Classroom:

I decided to go with Classroom over Edmodo because of its integration with Google Drive, which is undoubtedly part of their master plan. It lacks the fancy apps that Edmodo has, but what it does, it does well. And with the use of add ons like "Flubaroo" it can be made to do some powerful things . . . 

Part 2: Remind.com (My 1st Year as a 1-to-1 Teacher)


June 22, 2015

Remind.com was the revelation of the year for this teacher. I resisted it at first because I thought it was too much about taking responsibility off of the students, etc. But, as with every tool, it comes down to how you as a teacher apply it, and it ended up making life much easier and more organized on my end and for the students too.

Setup is simple. The teacher makes a class on the website, it generates a code, the students can text the code to the phone number 81010, they get a reply asking for a name, they input their name and it's off and running. To keep track of things better, ask your students not to use any kind of fake name. If they have privacy concerns, I let them use their first name and last initial, but no "Squidward" or "Xena" names.They then receive text messages with the reminders sent by the teacher, but they receive texts from Remind.com, not from the teacher's personal cell phone.

Students can also submit their email addresses to get reminds at their email accounts if they don't want to get texts from their teacher. There is also a smart phone app for Remind.

For this teacher, Remind totally replaced writing assignments on the board, which I wasn't that good about to begin with. The most useful feature was that I could schedule reminders to be sent (ahead of time)--for instance automatically sending a message two days before an assignment is due and then again the day before.

The reminders also support file attachments and links, so teachers can also include supplemental materials.

Part 3: Evernote (My 1st Year as a 1-to1 Teacher)


June 23, 2015:

For research in English class, Evernote has been insanely useful. It has completely freed this teacher from the tyranny of piles of index cards, etc. Full disclosure, I actually pay for the premium version to use in my personal life, but all features discussed here are part of the free accounts.

Evernote has many applications, but at its most basic, it is a filing cabinet to store and organize information in the cloud. There is an app for Evernote. There are a number of associated apps like Penultimate and Scannable. There is also an "Evernote web clipper" which is an extension for Chrome and Firefox that allows users to "clip" articles from the web directly into Evernote. Also, there is another plugin called "Clearly" that cleans up and simplifies the formatting of a web page to make it easier to read. And there is much, much more.

For detailed information on how this teacher used Evernote in class this year, keep reading . . . 

Part 4: Turnitin.com (My 1st Year as a 1-to-1 Teacher)


June 23, 2015:

Turnitin.com is known for it's plagiarism busting skills. In truth, I've never been sure if it's that much better than some well-placed Google searches. But I have found its online editing tools to be invaluable when it comes to paper grading time.

This is going to be a shorter post, but the main point is that I find that I've converted over from never grading papers on the computer to preferring grading on the computer because of Turnitin.

The thing that convinced me is efficiency. Have you ever done the math? If you have 120 papers to grade and each takes 10 minutes, that's 20 hrs of grading per project (1200 minutes). Turnitin doesn't make that go away, but it makes things much more efficient . . . 

Saturday, November 1, 2014

Google Docs for researchers (from EducatorsTechnology.com)


Google Docs help on EducatorsTechnology.com:

The website Education Technology and Mobile Learning has an entire page devoted to using Google Drive in the classroom.

The page previewed above is one of the most useful. It shows how to use Google Docs' built in spell checker and word counter. It also goes into more detail about how to use the "research" sidebar and how to put citations into a paper with just a single click and without ever leaving the document you are working in.

Click on the links above, or click here ,for more in-depth information.


Thursday, October 30, 2014

Using Add-ons in Google Drive


Google Drive Add-ons: 

Google Drive users now have the ability to incorporate "Add-ons" to add features to various Google Apps. One of the most useful is the "Easy Bib" add-on.

To install an Add-on, open a blank Google document and then click on "Add-ons" (highlighted in yellow above) and then "get add-ons." That will take you to a mind-boggling array of options. Almost all of them operate on the "freemium" model, which means they provide some basic features for free and offer additional features for a cost.


Once EasyBib is installed it will be available in all Google documents that the user edits in the future. To open EasyBib, click on "Add-ons," "EasyBib," and then "Manage Bibliography" (even if it's your first entry).

At that point, a sidebar opens and the author can enter a book or journal title or a website address and, in most cases, it will automatically create a works cited entry. The author can choose between MLA, APA, or Chicago styles. The example below is from a source found on "Google Books."


As previously stated, there are a huge number of options for add-ons. there are flow chart designers, mind map makers, formula editors, translators, rhyme makers, and much, much more. If you find one that is particularly useful, feel free to post it in a comment below.

Friday, October 24, 2014

New editing features in Google Docs


Click on pic for more detailed view

Making edits as "suggestions":

Google has added an interesting new editing feature to Google Docs. It's always been possible to add comments to documents--that's what the yellow highlighted elements above are showing--but it's now possible to edit the paper but have those edits show up as "suggestions" in green.

The function is similar to the editing/change tracking features in Word, but is actually much lighter and simpler to use. Any time the editor makes a change in the paper, a box appears in the sidebar that automatically explains the change that the editor made. The edit also appears in green font in the text itself.


Tuesday, September 30, 2014

Google Classroom--An Edmodo Competitor?


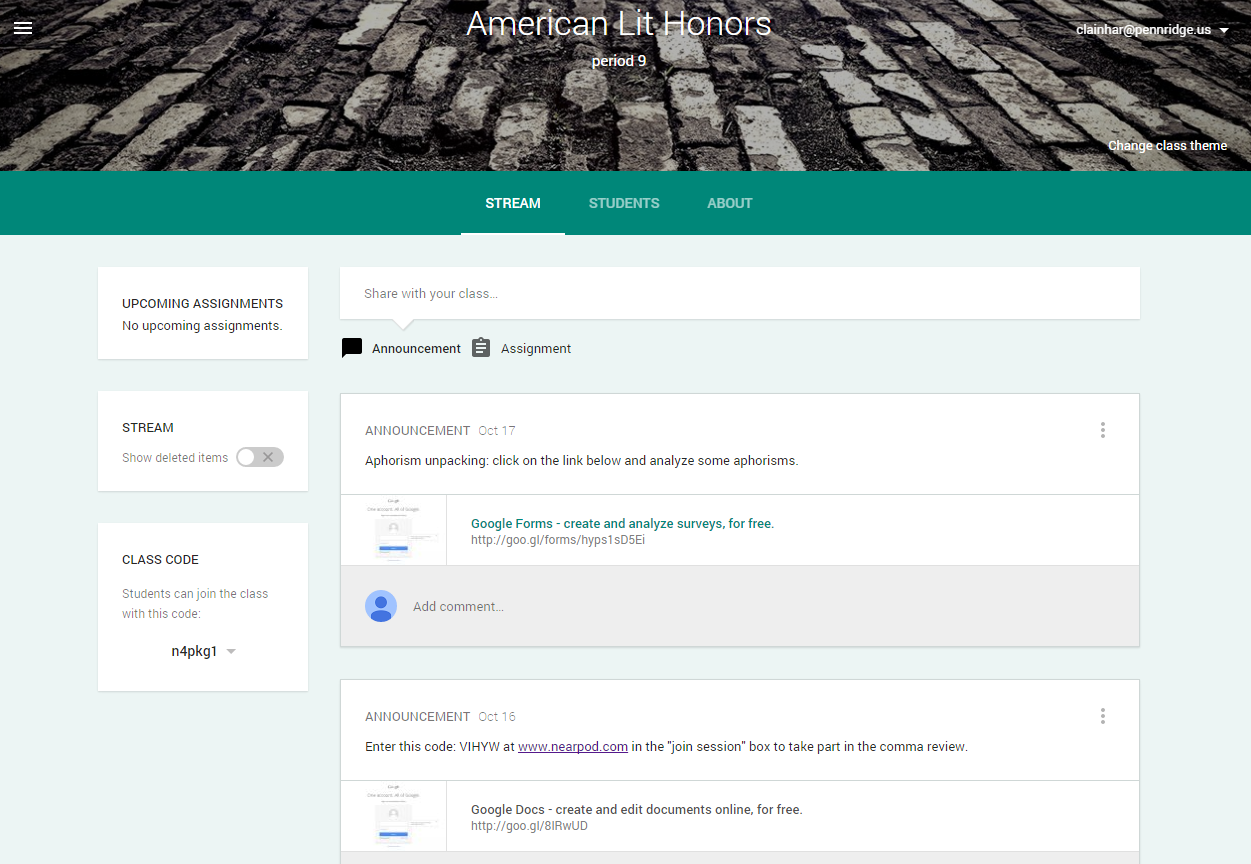
Google Classroom is Google's new foray into the education market. Others like Edmodo have been there much longer and are more firmly entrenched. Right now, if you already use Edmodo, it is this author's opinion that switching to Classroom probably isn't worth it.

However, if you're looking to move beyond your static classroom webpage, Classroom is a fairly simple option. You can find it at classroom.google.com.

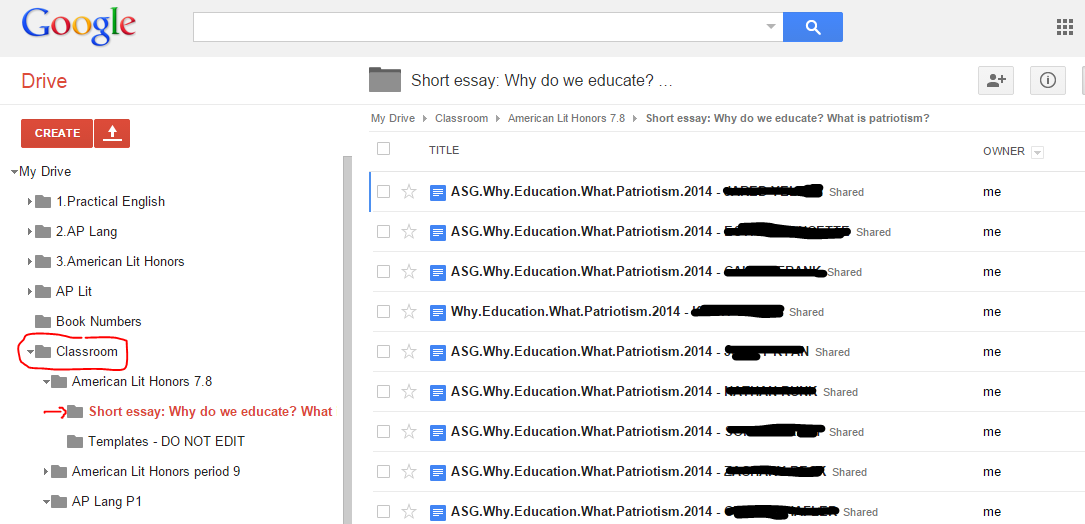
Above is a screenshot of the Classroom news feed. There, teachers can make announcements, post links, and post assignments. The advantage Classroom does have is its tight integration with Google Docs. If a teacher uses the "assignment" option in Classroom (for more information click here), Classroom automatically creates a folder in the teacher's Drive account. When the students turn in their assignments on Docs, the file automatically goes into the correct folder.


That automatic filing is a significant step up from using the "Shared with me" window in Drive and then manually sorting files into folders from there.

Thursday, August 28, 2014

Updates and Further Tips for Google Drive

In the past year there have been a few changes to Google Drive/Docs but the basic site has stayed the same. One of the best changes is the integration of Google search directly into Google docs.  Now students can highlight any word in the document they're working with, right click, and select "research."  A small Google search box opens on the right side of the screen but still within the document itself.


It's then possible to do additional searches using the search bar within that box.


Google Drive/Docs lends itself very well to informal writing and to reducing the paper piles.  Having students submit rough drafts on Google Drive and reading them on Drive (there are apps for iPad and Android) can remove that pressure that a lot of teachers feel to put marks on everything.  One feature that works well for this is the comment option.  Click past the jump to read more:

Saturday, August 23, 2014

Making a Form


Making a Google Form:

Google Forms are tools that allow teachers (or students) to create questions that, when answered, are tabulated into answers on a spreadsheet.  There is some complexity involved in creating questions of different types, but once you figure it out, it can be a handy way to assess students.

Below is a simple form that I made up for my American Literature class. There are many background themes that you can apply to the form. Google added some new themes recently that are a big improvement:


The results are first put into a spreadsheet in Google Docs that looks very similar to an Excel spreadsheet.


There is also a summary view that generates tables and statistics of the results.  An example of the summary view is below:


To look at the spreadsheet view for the data above, click on this link.  Once that form opens, clicking on "form" then "show summary of responses" will show you the images above in full.

Clicking on "form" and "go to live form" will take you to what the teachers who responded to the form saw as they were filling it out.

To create a form of your own, return to the "Documents" home screen, click on "Create" and then "Form."  From there it gets somewhat too complex to spell out in blog format.  For further information, check out Google's help documents on creating forms located here.


Wednesday, December 4, 2013

Tip #3--Revision history and tracking changes

Note the revision history sidebar on the right

Depending upon what sharing permissions are set by the document owner, any document editor can access the revision history by clicking on "file" and then "see revision history."  It's advisable for teachers to require that students set sharing permissions as "can edit" for the classroom instructor, so that teachers can then view all necessary information.  Directions on how to do that are located here in the Google Docs help center.

Being able to see revision history is useful in multiple ways.  It allows teachers (and other collaborators) to see what changes have been made by what users.  It can allow teachers an easy way to see what revisions (if any) students have made to their documents throughout the writing process.  Depending upon the edit, the change will often appear in different colors.  In the above picture, Feb. 4, 3:21 PM shows that "clainhar" replaced a lower case "p" with an upper case "P."

In the event of essay rewrites or project "do overs," the teacher can quickly see what additions and changes students have made.  The "show more detailed revisions" button at the bottom of the revision history sidebar allows teachers to delve even more deeply.

In addition, revision history makes it easy to see when students have submitted their assignments.  This could allow teachers to set one deadline for all students and to know definitively who has met the deadline and who hasn't.

Tuesday, June 11, 2013

Tip #8--Using Google Groups to promote student writing


Google Groups is Google's take on an aspect of the web that's been around for as long as the Internet--discussion boards.  It is not fancy, but it can provide you with a great way to engage students in some informal writing and to engage them in discussion with each other about class concepts.

In the example above, AP English students have been asked to debate the issue of man's role in global warming.  You might ask, why don't I just have them do this in a Google document?  And the answer is that you could.  However, it does open up some possible problems, especially when dealing with young folks who don't always make the best decisions.  Since everyone who is sharing the document can edit it as they like, which could enable some ne'er-do-well to engage in electronic vandalism. Sure, you should be able to catch the culprit using revision history, but if someone were smart enough to lift another student's log in information, it might be hard to track down the true culprit.

Google Groups allows you as the instructor finer control over what is posted and even provides content filtering and the ability to flag for moderation posts that may be inappropriate .  It can be somewhat complicated to set up, however, but once it's done, it can be a very effective tool for student writing.

Mostly, though, the students become very motivated by the opportunity to engage with and comment on each other's ideas. It can often result in very animated, but moderated, discussions.

Wednesday, June 6, 2012

What is Google Drive?

Google Drive


You may have noticed that Google Docs is now called "Google Drive." For the most part, this change is just a re-branding of what Google Docs has already been able to do.  As stated in previous posts, it's been possible to upload all different types of files to Google Docs for quite awhile.  "Google Drive" is mainly just Google deciding to make it official.  They will be rolling out the change in three phases.  By the end of the third phase, everyone's "Documents" choice in Google Apps will change to the name "Drive."

The web interface will change slightly, but for the most part the experience will be the same.  

There is another aspect to "Drive" that would require a significant amount of changes if it were to be applied within the district.  "Drive" has a downloadable desktop app that functions as a local repository for documents and files stored on Google Apps.  Installing this app would require administrative privileges, which is why it would require a larger conversation about whether it should be implemented or not. There are also apps for iOS and Android smart phones.

The "Drive" desktop app allows users to setup offline access, so that they can edit Google Documents without an Internet connection.  Then, when the computer has access again, the "Drive" app syncs the files edited on the local computer with the files stored in the Google Apps cloud.  

Thursday, February 16, 2012

Tip #9--Ideas for Student Use

How students can put Google Docs to use:

  • Divide up work:  Students can work side-by-side on the same document, splitting up the work load
  • Always have their files:  Instead of emailing files to themselves, students can upload their non-Google files to Docs and then download them at school.
  • Record research:  Instead of using index cards to record research for papers or projects, students can create a Google document and share it with their teacher
  • Share research:  Students can easily take notes and then share them with other students of their choosing (of course, this could also make plagiarism easier as well)
  • Make presentations:  Google recently update their Presentation maker to include things like embedding video files and creating animations.
  • Draw:  Use Google Drawings to collaborate on and create charts, diagrams, logos, etc.
  • Meet up virtually:  Students can be assigned group work at home (provided they have computers and Internet) and they can "meet" on the web instead of having to physically get together.

One thing that is certain is that those students who are comfortable with technology will always come up with new and unique "tweaks" to use these emerging technologies.

Sunday, February 5, 2012

Tip #7-Flipping the Classroom

The concept of flipping the classroom is a hot topic in education at the time this blog post is being written.  Largely pioneered by a website called "The Khan Academy," to "flip" the classroom means to record and store lessons online, to assign students to view them before the next class, and to spend class time helping the students apply what they've learned.  It's called "flipped" because it takes the traditional model of teaching a topic in class and sending the kids home to work on it, and reverses it.

The theory is that instead of sending kids home to grapple alone with what you've taught them, teach them "at home" and then work with them in school to develop their skills.  Below is my first stab at trying this technique.  It is a PowerPoint of background information about Macbeth with narration that I converted to a movie and uploaded to Google Docs, as well as posting it on the blog below.  To share it with the students, I will email them a link from the Google Docs share function:


Full disclosure:  The PowerPoint/video above was made using Microsoft Office 2010 because Office 2007 does not have the ability to save files to video (unless you purchase a third party add on).  Keynote, for Mac, does support saving presentations as video files and has for quite awhile.


Tip #6--Storing and viewing video files

Any video files uploaded to Google Docs can be viewed from within Docs itself, without downloading the files.  One assumes that this feature will be more likely to work on computers outside of school, but one never knows. Also, all copyright laws do apply, and you can be held responsible for any content posted in violation of those laws.


The picture above shows the file name for a video lecture on using the verb "To Be" that has been uploaded to Google Docs.  The "eye" icon above the file will appear when the file is selected.  Clicking on the eye will cause the video to open and play within the browser.  A screenshot is below:


Tip #5--How to upload and download files

To upload files to Google Docs, as we discussed in Tip #4, you need only open Docs and click on the red upload button:


Using Google Chrome, it is possible to upload entire folders to Docs, but we will focus on sending just files for now.  The process is the same for folders.  Clicking on "Files" opens up the box below:

Note that the two boxes marked "convert" are unchecked.  This means your file will upload in the original format.  If you check the first box, Google Docs will convert your document to their proprietary format.  If you check the second box, Google Docs will convert a PDF file into Google Docs format.   Click "Start upload" and a box will pop up in the bottom right corner displaying your upload status.  Once it's done, your files have been uploaded to Google Docs and can be accessed from any computer with an Internet connection:


Downloading files is just a matter of checking the box next to the file and selecting "more" and then "Download."  Once there, a pop up will appear giving you choices about what type of file you wish to download.


** Side note:  If you uploaded a PDF file (perhaps one that you have scanned to file) to Docs and converted it, you can now download the file as a Word document that can be modified.


Tip #4--Storing files on Google Docs--The Why

Storing files on Google Docs without converting them to Google's proprietary format:

An under-publicized feature of Google Docs is the ability to upload files to Google's servers and to keep those files in their original file format.  There are other services that do this, such as Dropbox, but using Google Docs is a simple and effective method.

Why would you want to do this?  If you have files that have been created in Microsoft Word or PowerPoint, the formatting does not always convert well into Google Docs.  So, for instance, if you have used multiple, very bright colors and fancy designs in your PowerPoint presentation, they may all be reduced to one, bland web-safe color or disappear entirely.

Below is a screenshot of a folder that contains files that have not been converted to Google Docs format.  The blue W indicates Microsoft Word files and the Adobe symbol indicates PDF files.  These files involve tables and text boxes that would not convert well.  Using this method, each user that has access to the folder can download the files in their original form and utilize them.


A key point:  When you choose to use Google Docs in this way, none of the collaboration or chatting or revision history features will be available.  You are simply making use of Google's server space to store your files.  Theoretically, as long as you were guaranteed a working Internet connection, you could store all of your files for work or school this way and never have to carry a USB drive or portable hard drive with you again.  This is a core idea of "cloud computing."

Tip #2--Document Collaboration

Chatting inside documents

When a shared document is opened by another Google Apps user, a notification appears in the top right of the screen and a different colored cursor shows within the text.  You can then view the changes that person is making as they make them.

By clicking on the notification at the top right of the screen, you can begin chatting with the other editor.  Multiple users can edit a document and chat about it at the same time.


Saturday, February 4, 2012

Cloud computing

If Google Apps is in the "cloud," then what is "cloud computing"?

Cloud computing is the current trendy term used to describe services like Google Apps, iCloud, Evernote, Microsoft Skydrive, and more.  Being "in the cloud" is just tech jargon meaning that the actual programs you use are running on remote servers elsewhere in the world, and the user is accessing them over the Internet via a web browser. 

Before broadband Internet, cloud computing was not possible, and it's actually a huge step forward in computer technology.  The advantages are that the user doesn't need to download and maintain software on their computer--the service provider does that for them--and that the user doesn't have to worry about backing up files because the service provider maintains their files for them.   Disadvantages include privacy concerns (how much of your life do you want to store on the Internet?), security concerns (can Google be hacked?), and that a high speed Internet connection is required to reach and use the services.

Google is one of the biggest cloud computing providers in the world, and it operates dozens of data centers all around the world that process more than 20 petabytes (20 million gigabytes) of information per day. And while they try to keep the exact locations of those data centers secret, the map below shows the locations of some of their known data centers.